Showing posts with label L'Oreal. Show all posts
Thursday, July 25, 2013
OMD! Challenge Day 25-Inspired by a Movie
I actually did these nails right back at the start of July when me and the Mr. went to see Despicable Me 2 but they are inspired by the (awesome) first film. Of course I did some minions, but I didn't want to do a full hand of them, so I also did the 3 little kittens [Adorable GIF alert!] from the book featured in the film which everyone knows represent Agnes, Edith and Margo-Gru's adopted daughters.
Polishes used: Revlon-Electric, Barry M-Blue Denim, Matt White, Lychee, Nail Art Pens, L'Oreal-Valiant, Sally Hansen-Himalayan Blue, Fairy Teal, Rimmel-Rose Libertine, Marshmallow Heaven.
After sitting and watching me do my nails for an hour or so, my boyfriend asked me if I would do some minions for him too, which was awesome because I was expecting him to hate how long it took! Of course I obliged and he loved having them on his thumbs for a few days! It also looked really adorable when we held hands ^_^
~Nail Art Novice~
Friday, June 7, 2013
ABC Challenge: V is for Valiant and cheVrons
I only have one 'V' polish but I knew I wanted to use it today because it's a colour I really rather like. Valiant by L'Oreal is a lovely tarnished silver/gun metaly sort of colour that I used as a base for some chevron nail art-because chevrons are essentially just 'Vs' anyway, right?
I had to be pretty valiant with this mani-it's not a difficult one at all, and I was using some French mani guide stickers I got on Ebay to make the chevron shapes so should have been a doddle but I had so many problems with it. I nearly gave up on it several times but persevered in the end and it's turned out OK. It's annoying that it doesn't show how much effort went into it though-it took me an hour and a half in the end! AAH.
Anyway. Other polishes used were Collection-Look At Me!, Barry M-Mango, Barry M-Key Lime, Barry M-Guava and Barry M-Prickly Pear (Haha, guess what collection I bought the other day?!). I love the effects you can get mixing different types of polishes-in this case a shimmery metallic and some cremes.
By the time this was done I really didn't care about the wrinkles you can see in some of them-I wasn't starting again! It's not perfect but it'll do, and sometimes that's the best you can hope for! I dunno...the colours are awesome but I'm not really feeling it after all the trouble it caused me!
Hoping for better luck next week! In the meantime, check out all other ladies' entries on the Inlinkz below =)
~Nail Art Novice~
I had to be pretty valiant with this mani-it's not a difficult one at all, and I was using some French mani guide stickers I got on Ebay to make the chevron shapes so should have been a doddle but I had so many problems with it. I nearly gave up on it several times but persevered in the end and it's turned out OK. It's annoying that it doesn't show how much effort went into it though-it took me an hour and a half in the end! AAH.
Anyway. Other polishes used were Collection-Look At Me!, Barry M-Mango, Barry M-Key Lime, Barry M-Guava and Barry M-Prickly Pear (Haha, guess what collection I bought the other day?!). I love the effects you can get mixing different types of polishes-in this case a shimmery metallic and some cremes.
By the time this was done I really didn't care about the wrinkles you can see in some of them-I wasn't starting again! It's not perfect but it'll do, and sometimes that's the best you can hope for! I dunno...the colours are awesome but I'm not really feeling it after all the trouble it caused me!
Hoping for better luck next week! In the meantime, check out all other ladies' entries on the Inlinkz below =)
~Nail Art Novice~
Wednesday, May 22, 2013
L'Oreal Color Riche Collection-604 Metropolitan
I had completely forgotten I hadn't uploaded my final two swatches of my Color Riche polishes, so apologies! These last two are definitely my favourites of the ones I got from Fragrance Direct.
Today's swatch is number 604-Metropolitan which is a lovely grey creme.
This is three coats with no top coat-you can see that it's really lovely and glossy. I could have easily only used two coats for the same effect. The thumb and ring finger show stripes done with all four colours that I purchased-607-Rue Montmartre, 608-Luxembourg Garden, 604-Metropolitan and 502-Purple Disturbia. I think the bubbles on these were caused by my application technique as opposed to the polishes themselves.
Today's swatch is number 604-Metropolitan which is a lovely grey creme.
This is three coats with no top coat-you can see that it's really lovely and glossy. I could have easily only used two coats for the same effect. The thumb and ring finger show stripes done with all four colours that I purchased-607-Rue Montmartre, 608-Luxembourg Garden, 604-Metropolitan and 502-Purple Disturbia. I think the bubbles on these were caused by my application technique as opposed to the polishes themselves.
| Natural Light in this photograph |
Unlike the other two polishes I've swatched thus far, there is no ambiguity about colour with Metropolitan-it's a lovely shade of grey-not too dark or too pale. Application was lovely because it has the same long, flat brushes that the other Color Riche polishes have (see this post for a picture) which allow you to cover the nail in two strokes. I didn't need to do any clean up following applying this polish for these pictures, which I was particularly impressed at as I hate cleaning up!
I got these from Fragrance Direct priced £1.20 (they have about 15 shades currently) but they are also available (in limited shades) at Boots and Superdrug for £4.99. Bearing in mind they only have 5mls of polish in I think that's a little pricey! A word of warning though, if you do order some from FD then search for swatches first because the colours on their website are very misleading!
I've got one more swatch to come, and keep an eye out, it's a gorgeous colour-my favourite of the bunch!
~Nail Art Novice~
Friday, April 19, 2013
L'Oreal Color Riche Collection-608 Luxembourg Garden
Here's my second post of swatches from my (random assortment of the) L'Oreal Color Riche collection and today's is number 608-Luxembourg Garden. This is another difficult one to describe-it's sort of dark greeny grey with lots of green shimmer running through it, so it sort of comes out as a metallicy green. I realise that doesn't make sense, but it's a bit of a chameleon, it seems to change colour depending on what you put it next to!
For instance, on my green swatch wheel, it looks distinctly out of place and very dark, hardly green at all:
(Incidentally it makes me really happy that I've not found any colours the same as each other during my swatching, means that all my polishes were totally justifiable!)
But on my fingers it definitely looks quite green:
This is again 3 coats without topcoat. This one definitely needed the three, unlike Rue Montmartre, which could have escaped with two-this is a lot more sheer. It's not as shiny either, it's definitely more on the metallic side of the spectrum. Application was easy and dry time was pretty fast! I really like these long flat brushes, it makes the polish really easy to control-again this required no clean up (except on the accent nails, but that's because I was being naughty and polishing horizontally across the nails!).
I even remembered to take a picture of the brush this time:
As you can see it's super long and very wide, it splays out quite a lot when you apply pressure and covers your nails easily in two strokes (one for little finger) but without getting polish all over your cuticles which get a massive thumbs up from me, coz I hate cleaning up!
I got my Color Riches from Fragrance Direct for £1.20 each but they're also available in Boots and Superdrug (although they don't seem to have all the colours anywhere!) for about £4.99! You only get 5mls in each bottle, so you have to really want one for that price!
Thanks for reading!
~Nail Art Novice~
Check out the lovely British Nail Bloggers magnificent work this week:
For instance, on my green swatch wheel, it looks distinctly out of place and very dark, hardly green at all:
| Luxembourg Garden is number 1 (If you want to know any others, just ask!) |
But on my fingers it definitely looks quite green:
| Natural light shot |
This is again 3 coats without topcoat. This one definitely needed the three, unlike Rue Montmartre, which could have escaped with two-this is a lot more sheer. It's not as shiny either, it's definitely more on the metallic side of the spectrum. Application was easy and dry time was pretty fast! I really like these long flat brushes, it makes the polish really easy to control-again this required no clean up (except on the accent nails, but that's because I was being naughty and polishing horizontally across the nails!).
I even remembered to take a picture of the brush this time:
As you can see it's super long and very wide, it splays out quite a lot when you apply pressure and covers your nails easily in two strokes (one for little finger) but without getting polish all over your cuticles which get a massive thumbs up from me, coz I hate cleaning up!
I got my Color Riches from Fragrance Direct for £1.20 each but they're also available in Boots and Superdrug (although they don't seem to have all the colours anywhere!) for about £4.99! You only get 5mls in each bottle, so you have to really want one for that price!
Thanks for reading!
~Nail Art Novice~
Check out the lovely British Nail Bloggers magnificent work this week:
Thursday, April 11, 2013
L'Oreal Color Riche Collection-607 Rue Montmartre
I thought I'd bring you some swatches of some of the Color Riche collection by L'Oreal that I went and bought after I fell in love with Magic Croisette. I purchased them from fragrancedirect.co.uk which is an excellent site for getting awesome polishes for cheapy cheap from-the only trouble is that the colour swatches they use are really inaccurate for the colours the polishes actually are. When I was searching online for better swatches of these polishes, they were really hard to come by so I thought I'd make some of my own. I'm categorically not going to start swatching a lot of polishes on this blog, because there are enough sites out there that do that, with better pictures than I could ever take, but as these polishes seem to be rarer than a lot of others I hope you won't mind too much.
I got four colours-607-Rue Montmartre, 608-Luxembourg Garden, 604-Metropolitan and 502-Purple Disturbia but I'm going to dedicate a post to each so that I don't overwhelm you with pictures all in one go.
Today's offering is number 607-Rue Montmartre, which is a dusky purple/grey. This is 3 coats with no top coat, with accent nails featuring all 4 colours:
Overall I do really like this polish, although I think I'm going to struggle to wear it with other colours as it's such an odd one to match. She'll have to be a stand alone girl!
What do you think of my first swatching post? Did I do OK or did I forget something important?
~Nail Art Novice~
It's British Blogger link up time-check out these ladies and their beautiful nails:
I got four colours-607-Rue Montmartre, 608-Luxembourg Garden, 604-Metropolitan and 502-Purple Disturbia but I'm going to dedicate a post to each so that I don't overwhelm you with pictures all in one go.
Today's offering is number 607-Rue Montmartre, which is a dusky purple/grey. This is 3 coats with no top coat, with accent nails featuring all 4 colours:
| Natural light, and probably the closest to its actual colour |
It's a bit of a weird one this-it's too grey to be purple and too purple to be grey. In my head it's a kind of 'lavendery grey' so I put it in with the rest of my purples. You only get 5mls in these teeny bottles but for the Fragrance Direct price of £1.20 a bottle I don't mind! I definitely wouldn't pay the full price of £4.99 for such a small amount of polish though.
Application was pretty good-they have a wide flat brush which splays out a little when you use it-I managed to cover my little finger nail with one stroke and the rest only needed two. I didn't do any clean up on these nails and I managed not to get too much on my skin, which is a bonus and shows that even Novices can use the brushes well! It was fairly opaque in two coats but I put a third on just in case. As you can see, it's really shiny and lovely when it dries and doesn't leave obvious brush strokes behind.
What do you think of my first swatching post? Did I do OK or did I forget something important?
~Nail Art Novice~
It's British Blogger link up time-check out these ladies and their beautiful nails:
Tuesday, March 26, 2013
Try Something Tuesday-Stamping!
As I mentioned yesterday, I'm not going to take off my lovely Magic Croisette manicure until I absolutely have to, so I needed a way to upcycle it for today's Try Something Tuesday. Cue my first attempt at stamping on my own nails (as opposed to falsies-on-sticks or whatever they're called) now I've got my new plastic scraper (thanks to a giveaway prize from The Sorting House, yay!).
I thought I'd stick with the celestial theme and chose a moon and stars image and a twinkly starry one. My stamping plates are unbranded and un-numbered-I got them from Ebay with a basic stamping starter kit so they're not the best in the world, but decent enough for me!
I used L'Oreal-Valiant for my stamping because it's quite opaque in 1 coat, and I don't have any proper stamping polishes, and I thought the silver would look nice against the blue.
(I will apologise now for the tip-wear visible in these photos-I basically spent last night rearranging all my books and DVDs on my shelves and tidying my desk, so my nails took a bit of a battering! But hey, I can cope with a bit of tip-wear if you can!)
I just stamped one image onto each nail at first (following this picture tutorial from Nail Art 101):
but then I decided that they looked a little plain (not to mention wonky) so I went back and added more afterwards-giving me more chances to perfect my technique!
They're not perfect, plus they were a faff to try and photograph-I don't think my camera likes subtle designs! Overall I'm pleased though, I don't think they're that bad for a first attempt. I've since discovered this really helpful video from soguesswhat11 which I will definitely be following next time I have a go.
I really like the patterns on my thumb, forefinger and right little finger (which I don't have a photo of, sorry!), I think they came out really well. As I said, not perfect, but you can definitely tell what they are! I also love that Croisette's beautiful shimmer is still coming through really well.
And so ends my first stamping adventure!
~Nail Art Novice~
NB Sorry if this post is a bit rambly/non-sensical, I'm somewhat sleep deprived and a bit loopy coz of it. But at least my shelves look good!
I thought I'd stick with the celestial theme and chose a moon and stars image and a twinkly starry one. My stamping plates are unbranded and un-numbered-I got them from Ebay with a basic stamping starter kit so they're not the best in the world, but decent enough for me!
| You can see how scratched up the plate got with the metal scraper! |
I used L'Oreal-Valiant for my stamping because it's quite opaque in 1 coat, and I don't have any proper stamping polishes, and I thought the silver would look nice against the blue.
(I will apologise now for the tip-wear visible in these photos-I basically spent last night rearranging all my books and DVDs on my shelves and tidying my desk, so my nails took a bit of a battering! But hey, I can cope with a bit of tip-wear if you can!)
I just stamped one image onto each nail at first (following this picture tutorial from Nail Art 101):
but then I decided that they looked a little plain (not to mention wonky) so I went back and added more afterwards-giving me more chances to perfect my technique!
| You may be able to see the silver splodges on my hand from the spillage disaster I had all over myself and my lovely desk- annoyingly if I hadn't have tidied it it wouldn't have got on the wood! |
They're not perfect, plus they were a faff to try and photograph-I don't think my camera likes subtle designs! Overall I'm pleased though, I don't think they're that bad for a first attempt. I've since discovered this really helpful video from soguesswhat11 which I will definitely be following next time I have a go.
I really like the patterns on my thumb, forefinger and right little finger (which I don't have a photo of, sorry!), I think they came out really well. As I said, not perfect, but you can definitely tell what they are! I also love that Croisette's beautiful shimmer is still coming through really well.
And so ends my first stamping adventure!
~Nail Art Novice~
NB Sorry if this post is a bit rambly/non-sensical, I'm somewhat sleep deprived and a bit loopy coz of it. But at least my shelves look good!
Monday, March 25, 2013
Magic and Planets
So I lasted all of two days before I took off my magnetic mani from last time and gave in to the beauty that is L'Oreal-Magic Croisette. As I mentioned, it's a beautiful royal blue polish with goldy/greeny/aquay shimmer in (hard to tell the actual colour as it's constantly changing in different lights!) and frankly it looks pretty amazing on my nails. I'm a bit sad though that after two coats on my (tiny) toe nails and two coats on my fingers I've already used up a FIFTH of the teeny bottle. I reckon after this it's going to be a special occasion polish because it's too nice to use up too soon!
I added an accent nail of Emily de Molly's gorgeous When Planets Collide which I bought ages ago and for some reason I had never used on my fingers! It's a lovely glitter polish with blue, teal and orange glitters of various sizes in a dark navy/black base and I probably could have layered it up without the Magic Croisette underneath as it's turned out quite dark looking, although still lovely. (For better pictures go to the listing on Emily de Molly's Etsy page.)
Anyway, enough talking, on to the pictures-two coats of MC and three coats of WPC on my accent:
Ooft. I love this. It's so shimmery and shiny and sparkly and all the colours in it look fab. I know the pictures don't do either of these polishes justice, but trust me, they both look amazing. I'm definitely in love, can someone just marry me to Magic Croisette please? You're going to be seeing more of this this week because I'm going to keep it on as long as I can, so will have to work around it tomorrow for Try Something Tuesday, but I'm sure I can think of something!
Until then,
~Nail Art Novice~
P.S I know these photos look messy but I just can't seem to clean them up any better! If anyone's got any advice for me as to how to get a neater clean up please let me know. At the moment I'm just using remover and a cotton bud and as you can see, it doesn't do the best job! Thanks =)
I added an accent nail of Emily de Molly's gorgeous When Planets Collide which I bought ages ago and for some reason I had never used on my fingers! It's a lovely glitter polish with blue, teal and orange glitters of various sizes in a dark navy/black base and I probably could have layered it up without the Magic Croisette underneath as it's turned out quite dark looking, although still lovely. (For better pictures go to the listing on Emily de Molly's Etsy page.)
Anyway, enough talking, on to the pictures-two coats of MC and three coats of WPC on my accent:
| This one taken in natural light |
| Just look how pretty those glitters are! |
Until then,
~Nail Art Novice~
P.S I know these photos look messy but I just can't seem to clean them up any better! If anyone's got any advice for me as to how to get a neater clean up please let me know. At the moment I'm just using remover and a cotton bud and as you can see, it doesn't do the best job! Thanks =)
Labels:
Blues,
Glitters,
Help,
Indies,
L'Oreal,
Mani Problems,
New Polishes
Saturday, March 23, 2013
Fishnets and Fog
This was an idea I came up with a while ago, around the time I bought my magnetic polishes, but never ended up doing it. I had originally planned to alternate the colours on each finger but decided on something different in the end, because I wanted to see if the magnetic polish worked layered over another colour-which it does, hurrah. I also had more success with it this time than last time and managed to get decent patterns on 8 out of 10 nails this time around.
This is two coats of Rimmel's Stormy Skies which is a beautiful blue-grey polish and two coats of Barry M's Neptune Sea (using the fishnet magnet) as diagonal tips. I was going to tape it off but decided in the end that I couldn't be bothered so these were freehanded-think I wasn't really paying attention on my middle finger, oops!
Here's a shot before I added the Neptune Sea too. I really like this grey, plus it applied like a dream. Probably could have got away with one coat but used two to fill in bits I'd missed first time around:
As a bonus, I also wanted to show you this gorgeous L'Oreal polish I picked up in Boots the other day as it was on sale for £2.50 because I really like it!
Magic Croisette is a royal blue polish with a aqua/greeny/goldy shimmer to it and it's lovely! It's only a mini but not bad for that price, I reckon. It's currently on my toes because I wanted to use it straight away, and I did try to get a picture but they all look a bit weird due to my dodgy toenails-they're all tiny! So I'll upload one if you really want to see it, otherwise you'll have to wait til I use it or look at some swatches here.
Here's a bottle shot which doesn't really do it any justice at all:
Hope you're all having wonderful weekends!
Edit 24/3: I think I fall for Neptune Sea a little more every time I wear it-the blue shimmers in it practically glow in the sunlight and it does look really really lovely!
~Nail Art Novice~
This is two coats of Rimmel's Stormy Skies which is a beautiful blue-grey polish and two coats of Barry M's Neptune Sea (using the fishnet magnet) as diagonal tips. I was going to tape it off but decided in the end that I couldn't be bothered so these were freehanded-think I wasn't really paying attention on my middle finger, oops!
Here's a shot before I added the Neptune Sea too. I really like this grey, plus it applied like a dream. Probably could have got away with one coat but used two to fill in bits I'd missed first time around:
As a bonus, I also wanted to show you this gorgeous L'Oreal polish I picked up in Boots the other day as it was on sale for £2.50 because I really like it!
Magic Croisette is a royal blue polish with a aqua/greeny/goldy shimmer to it and it's lovely! It's only a mini but not bad for that price, I reckon. It's currently on my toes because I wanted to use it straight away, and I did try to get a picture but they all look a bit weird due to my dodgy toenails-they're all tiny! So I'll upload one if you really want to see it, otherwise you'll have to wait til I use it or look at some swatches here.
Here's a bottle shot which doesn't really do it any justice at all:
Hope you're all having wonderful weekends!
Edit 24/3: I think I fall for Neptune Sea a little more every time I wear it-the blue shimmers in it practically glow in the sunlight and it does look really really lovely!
~Nail Art Novice~
Tuesday, February 26, 2013
Try Something Tuesdays-Saran Wrap Mani
Try Something Tuesday has rolled around again and I knew exactly what I wanted to do-Saran Wraps-but boy did I underestimate how annoying these would be to get right. I ended up redoing my left hand completely half way through which made me pretty grumpy and I almost wanted to give up on the whole thing. I'm glad I didn't though, I do actually really like the effect even if it was a pain in the bum to get right.
In the UK we don't seem to have access to this mythical Saran Wrap (I don't think) but I watched a couple of videos and it looks like a cross between cling film and cellophane (in that it stays rolled up in a ball if you scrunch it, but is definitely a bit crinklier and not as sticky-to-itself as cling film.). I went hunting around my kitchen for something that would work as effectively-cling film, kitchen foil and kitchen roll were my chosen subjects, and in the end I didn't use any of them! Cling film seems to be too smooth when it's scrunched up, it forms a ball that doesn't have enough rough edges to pick up the polish, foil is good but too sharp in that it punched all the way through my base colour as well, and kitchen roll is useless and fluffy.
I know I've read Saran Wrap tutorials where people used bits of old carrier bag, and was just about to go downstairs again (NB I do my nails in my attic bedroom, the kitchen is a long way away!) to liberate one when I saw something in my room that might work-bubble wrap! Now while it doesn't stay scrunched up in little balls like the rest, I ended up using this because it seemed to give the right effect as well as some slightly interesting patterns from the bubbles themselves, and it was a relief to find something that actually worked properly. I will probably try with carrier bags in the future though.
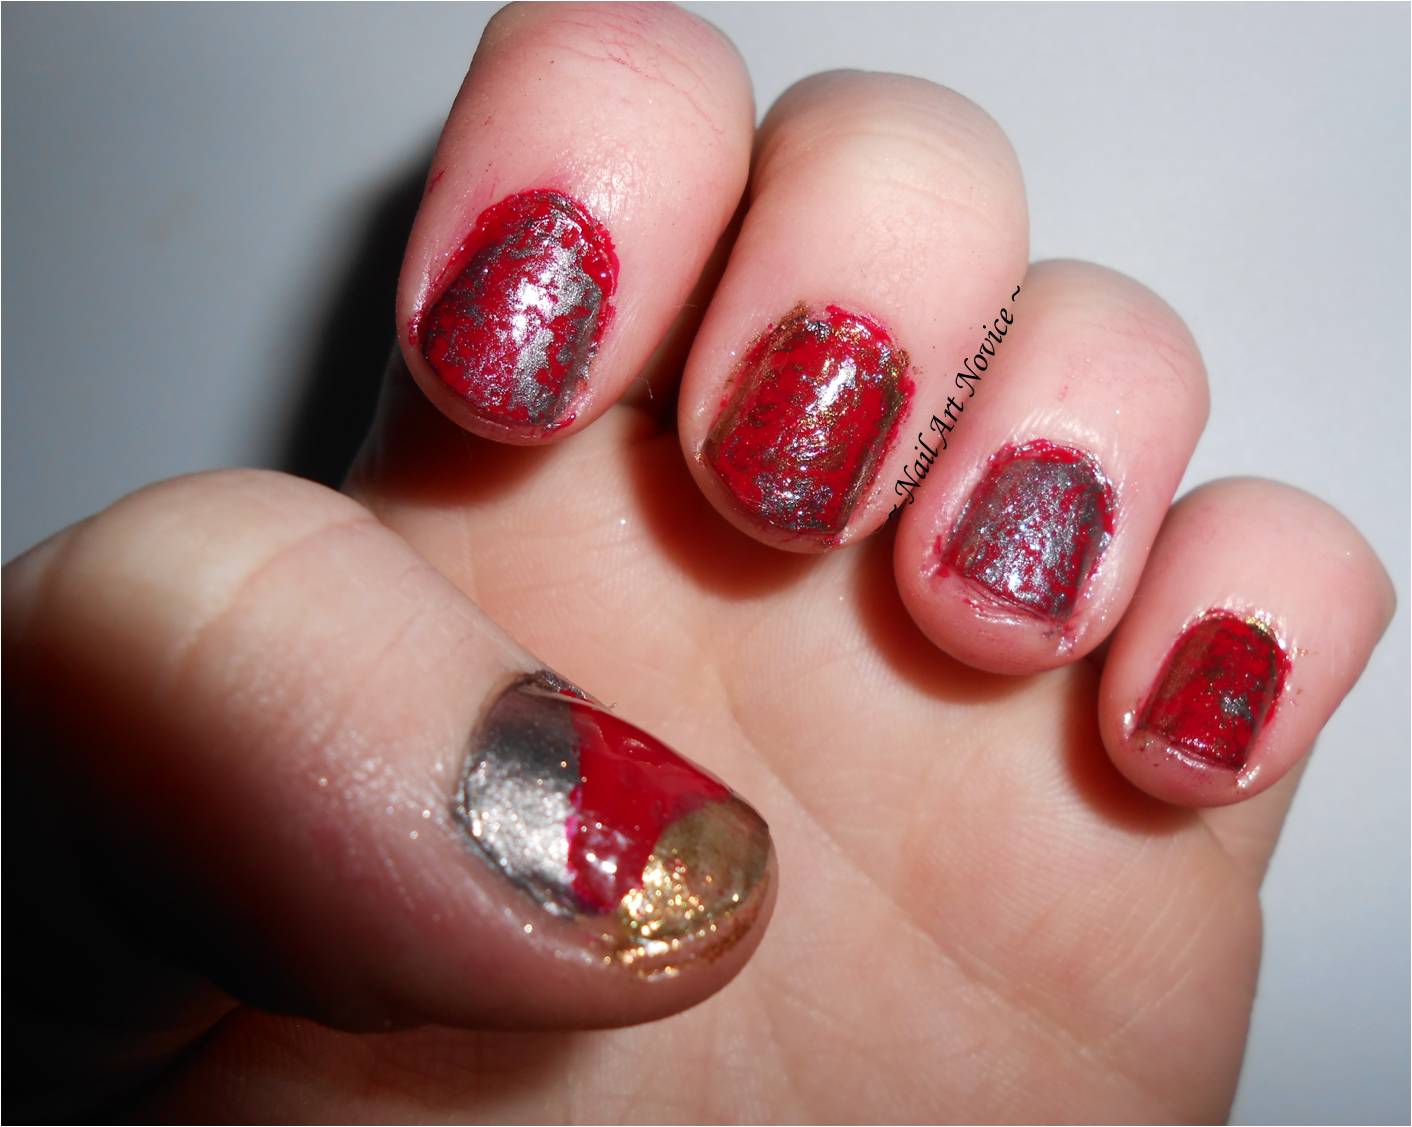
On to the mani. I knew I wanted a red base and wanted something that would work well with it rather than contrast against it for my top layers so I chose gold and silver metallic polishes. I used Number 7-Siren for my base, it's a very luxurious, proper red colour and applies very nicely. On top of that I used Loreal-Valiant and Colour Me-Pure Gold. These two look lovely together, as neither is a true gold or silver-Valiant is more of a metallic shimmery gun metal, and Pure Gold is a bit tarnished, less yellow than an actual gold colour.
These were quite difficult to photograph, think the pattern is a little bit subtle for my camera, nevertheless I did my best. I was going to do the pattern the other way around on my thumb but decided in the end to freehand triangles onto them for ease (and because it was now 1am by this point and I couldn't be bothered any more!)
Overall then, I do like this technique, it gives interesting an fun patterns that are still delicate and subtle enough not to overwhelm, I'll definitely be doing it again only hopefully with less faff next time! At least now I know what works and what doesn't, I guess. I've seen some awesome ones with two layers of colours used on top which also look pretty cool, so I might have a go at that at some point too.
Edit 27/2
Actually the longer I wear this the more I like it, it's really quite pretty in bright light and every nail is different and in dull light you can tell there's a shiny pattern but it's not overwhelming. Ticks all the boxes, will definitely be doing this again!
~Nail Art Novice~
In the UK we don't seem to have access to this mythical Saran Wrap (I don't think) but I watched a couple of videos and it looks like a cross between cling film and cellophane (in that it stays rolled up in a ball if you scrunch it, but is definitely a bit crinklier and not as sticky-to-itself as cling film.). I went hunting around my kitchen for something that would work as effectively-cling film, kitchen foil and kitchen roll were my chosen subjects, and in the end I didn't use any of them! Cling film seems to be too smooth when it's scrunched up, it forms a ball that doesn't have enough rough edges to pick up the polish, foil is good but too sharp in that it punched all the way through my base colour as well, and kitchen roll is useless and fluffy.
I know I've read Saran Wrap tutorials where people used bits of old carrier bag, and was just about to go downstairs again (NB I do my nails in my attic bedroom, the kitchen is a long way away!) to liberate one when I saw something in my room that might work-bubble wrap! Now while it doesn't stay scrunched up in little balls like the rest, I ended up using this because it seemed to give the right effect as well as some slightly interesting patterns from the bubbles themselves, and it was a relief to find something that actually worked properly. I will probably try with carrier bags in the future though.
On to the mani. I knew I wanted a red base and wanted something that would work well with it rather than contrast against it for my top layers so I chose gold and silver metallic polishes. I used Number 7-Siren for my base, it's a very luxurious, proper red colour and applies very nicely. On top of that I used Loreal-Valiant and Colour Me-Pure Gold. These two look lovely together, as neither is a true gold or silver-Valiant is more of a metallic shimmery gun metal, and Pure Gold is a bit tarnished, less yellow than an actual gold colour.
| Taken without flash to show that you can see the gold too |
Overall then, I do like this technique, it gives interesting an fun patterns that are still delicate and subtle enough not to overwhelm, I'll definitely be doing it again only hopefully with less faff next time! At least now I know what works and what doesn't, I guess. I've seen some awesome ones with two layers of colours used on top which also look pretty cool, so I might have a go at that at some point too.
Edit 27/2
Actually the longer I wear this the more I like it, it's really quite pretty in bright light and every nail is different and in dull light you can tell there's a shiny pattern but it's not overwhelming. Ticks all the boxes, will definitely be doing this again!
~Nail Art Novice~
Subscribe to:
Posts (Atom)